Part III - Listing Drones
In this part we will explain how to get an array of data from the bexstream backend API. In this case we will show how to list all the drones.
Firstly we will create a new folder called drone and inside the “drone” folder we will add the components, services and models related to drones.
1 - Drone Setup
Let’s create the DroneListComponent:
ng generate component drone/components/drone-list
Create the AssetService:
ng generate service drone/services/asset
Add the “models” folder inside the “drone” folder. This models folder will be used for the component specific models like the following two files:
 1export class Drone {
 2    id: string;
 3    latitude: number; // last latitude recorded once disconnects
 4    longitude: number; // last longitude recorded once disconnects
 5    onMission: boolean;
 6    hasCamera?: boolean;
 7    has360Camera?: boolean;
 8    hasSpeaker?: boolean;
 9    isDirectConnect?: boolean; // usually via telemetry
10
11    constructor() {
12        this.id = '';
13        this.latitude = 0.0;
14        this.isDirectConnect = false;
15        this.longitude = 0.0;
16        this.onMission = false;
17        this.hasSpeaker = false;
18        this.hasCamera = false;
19        this.has360Camera = false;
20    }
21}
 1import { Drone } from "./drone";
 2
 3export class Asset {
 4
 5    id: string;
 6    name: string;
 7    mountPoint: number | null;
 8    isActive: boolean;
 9    drone?: Drone;
10    lastConnected: Date | null;
11
12    isDirectConnect?: boolean; // usually via telemetry
13    missionCount?: number | null;
14
15    constructor(type: string) {
16
17        if (type === 'Drone') {
18            this.drone = new Drone();
19        }
20        this.id = '';
21        this.name = '';
22        this.mountPoint = null;
23        this.isActive = false;
24        this.lastConnected = null;
25
26    }
27}
To wrap the models part up we need to create the “PaginatorDTO” model. Inside the lib folder create the “models” folder and add the paginator.dto.ts file with the following code:
 1export class PaginatorDto {
 2    filter: string;
 3    limit: number;
 4    offset: number;
 5    sort: string;
 6    order: string;
 7    pageSizes: number[];
 8    subFilter: string;
 9
10    constructor(filter?: string, limit?: number, offset?: number, sort?: string, order?: string, pageSizes?: number[], subFilter?: string) {
11
12        if (filter !== undefined) {
13            this.filter = filter;
14        } else {
15            this.filter = '';
16        }
17
18        if (limit !== undefined) {
19            this.limit = limit;
20        } else {
21            this.limit = 5;
22        }
23
24        if (offset !== undefined) {
25            this.offset = offset;
26        } else {
27            this.offset = 0;
28        }
29
30        if (sort !== undefined) {
31            this.sort = sort;
32        } else {
33            this.sort = 'createdDate';
34        }
35
36        if (order !== undefined) {
37            this.order = order;
38        } else {
39            this.order = 'ASC';
40        }
41
42        if (pageSizes !== undefined) {
43            this.pageSizes = pageSizes;
44        } else {
45            this.pageSizes = [5, 10, 15];
46        }
47
48        if (subFilter !== undefined) {
49            this.subFilter = subFilter;
50        } else {
51            this.subFilter = '';
52        }
53    }
54}
The PaginatorDto is used in every data retrieval service like the following. The paginator has the purpose of reducing the quantity of data to be retrieved. To know more check the bexstream api swagger.
2 - Features implementation
Now that we have created the models, let’s implement the code to get them from the server. On asset.service.ts add the following code:
 1import { HttpClient, HttpParams } from '@angular/common/http';
 2import { Injectable } from '@angular/core';
 3import { Observable } from 'rxjs/internal/Observable';
 4import { PaginatorDto } from 'src/app/lib/models/paginator.dto';
 5import { Asset } from '../models/asset';
 6
 7@Injectable({
 8  providedIn: 'root'
 9})
10export class AssetService {
11
12  backendUrl = 'https://bexstream.beyond-vision.pt/api/v1/asset';
13  getAllDronesUrl = this.backendUrl + '/all/drone';
14
15  constructor(private http: HttpClient) {}
16
17  public getAllDrones(paginator: PaginatorDto): Observable<Asset[]> {
18
19    const params = new HttpParams()
20      .set('filter', paginator.filter)
21      .set('limit', paginator.limit.toString())
22      .set('offset', paginator.offset.toString())
23      .set('sort', paginator.sort)
24      .set('order', paginator.order);
25
26    return this.http.get<Asset[]>(this.getAllDronesUrl, {params});
27
28  }
29}
Now we need to use this service on the DroneListComponent to get the drones. On drone-list.component.ts add the following code.
 1import { Component, OnInit } from '@angular/core';
 2import { Asset } from '../../models/asset';
 3import { AssetService } from '../../services/asset.service';
 4
 5@Component({
 6    selector: 'app-drone-list',
 7    templateUrl: './drone-list.component.html',
 8    styleUrls: ['./drone-list.component.less']
 9})
10export class DroneListComponent implements OnInit {
11
12    assets: Asset[] = [];
13    paginator: PaginatorDto = new PaginatorDto();
14
15    constructor(private assetService: AssetService) { }
16
17    ngOnInit(): void {
18        this.listDrones();
19    }
20
21    private listDrones() {
22        this.assetService
23            .getAllDrones(this.paginator)
24            .subscribe((assets) => {
25
26                this.assets = assets;
27            });
28    }
29}
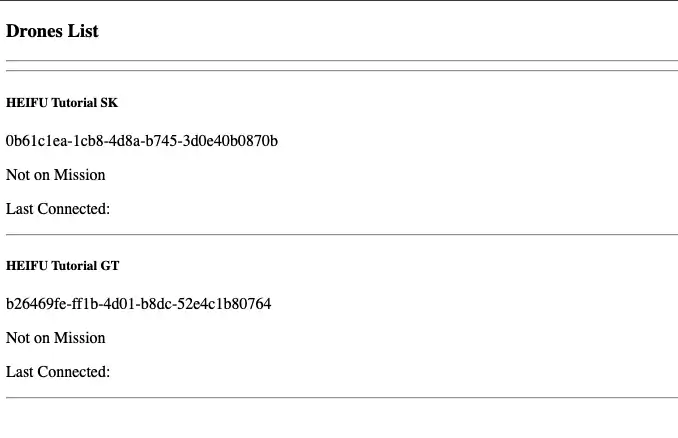
3 - Visualization
Third step is to show the drone on the UI. To perform this we will add the following code to drone-list.component.html:
 1<h3>Drones List</h3>
 2<hr><hr>
 3
 4<div *ngFor="let asset of assets">
 5    <h5>{{ asset.name }}</h5>
 6    <p>{{ asset.drone.id }}</p>
 7    <p *ngIf="asset.drone.latitude">Latitude: {{ asset.drone.latitude }}, Longitude: {{ asset.drone.longitude }}</p>
 8    <p *ngIf="asset.drone.onMission">On Mission</p>
 9    <p *ngIf="!asset.drone.onMission">Not on Mission</p>
10    <p>Last Connected: {{asset.lastConnected}}</p>
11    <hr>
12</div>
4 - Using new component
Now that we have the drone list done we need to add the route to it on app-routing.module.ts:
 1import { NgModule } from '@angular/core';
 2import { Routes, RouterModule } from '@angular/router';
 3import { LoginComponent } from './login/login.component';
 4import { DroneListComponent } from './drone/components/drone-list/drone-list.component';
 5
 6const routes: Routes = [
 7    { path: '', component: LoginComponent },
 8    { path: 'drones', component: DroneListComponent },
 9];
10
11@NgModule({
12    imports: [RouterModule.forRoot(routes)],
13    exports: [RouterModule]
14})
15export class AppRoutingModule { }
5 - App Routing
To complete this part we just need to add a routing feature to improve usability. After we log in we want out app to change to the drones list. To do this, after we log in successfully, we need to route the user to the drone list component. We achieve that by doing the following:
 1import { Component, OnInit } from '@angular/core';
 2import { FormBuilder } from '@angular/forms';
 3import { HttpClient } from '@angular/common/http';
 4import { Router} from '@angular/router';
 5
 6import { User } from './models/user';
 7import { WebStorageService } from '../lib/web-storage.service';
 8
 9@Component({
10    selector: 'app-login',
11    templateUrl: './login.component.html',
12    styleUrls: ['./login.component.less']
13})
14export class LoginComponent implements OnInit {
15
16    user: User = new User();
17
18    loginForm = this.formBuilder.group({
19        username: '',
20        password: ''
21    });
22
23    private readonly defaultURLRoute = 'drones';
24
25    constructor(private formBuilder: FormBuilder,
26                private http: HttpClient,
27                private webStorage: WebStorageService,
28                private router: Router) { }
29
30    ngOnInit(): void {
31    }
32
33    /**
34    * User authentication
35    */
36    public authenticate(): void {
37        const loginFormValues = this.loginForm.value
38        this.user.username = loginFormValues.username;
39        this.user.password = loginFormValues.password;
40
41        this.http.post<any>('https://bexstream.beyond-vision.pt/api/v1/auth/user', this.user)
42            .subscribe((result) => {
43
44                if (result.user) {
45                    alert(`${result.user.username} has benn successfully logged in!`);
46                    this.webStorage.storageToken(result.token);
47                    this.router.navigate([this.defaultURLRoute]);
48                } else {
49                    alert(`Error on login. Please check the username and the password!.`);
50                }
51            });
52    }
53}
Now run your app:
ng serve
If Part III was finished successfully, after you login, you should be able to see the list of drones that are inside the tutorial organization.