Part VI - Streaming
In this part, we will learn how to visualize the drone’s video stream.
Create a Janus Media Server Client Service
Let’s start by installing the janus-gateway library, by running the following command:
npm install janus-gateway-js --save
Now, create a new service to develop your logic and connections to the beXStream Janus Media Server.
Run the following command to generate the necessary files:
ng generate service lib/services/janus
On the drone janus Service, add the client variables, methods, and instantiate a janusClient:
  1import {ElementRef, Injectable} from '@angular/core';
  2
  3@Injectable({
  4  providedIn: 'root'
  5})
  6export class JanusService {
  7  // @ts-ignore
  8  Janus = require('janus-gateway-js');
  9  janusPath = 'wss://bexstream.beyond-vision.pt/janus';
 10  janusClient: any; // Holds the Janus Client object, used to generate connections
 11  streaming: any; // Streaming object
 12  videoElement: ElementRef<HTMLVideoElement> | undefined; // DOM element to retain the stream
 13  connection: any; // Holds the connection to Janus
 14  videoStopped: boolean; // Used to maintain status of a video stream. You may want to change to an array if you want to have multiple streams
 15  currentWatch: number | null; // Current streaming being watched
 16
 17  constructor() {
 18    this.janusClient = new this.Janus.Client(this.janusPath, {
 19      debug: 'all',
 20      keepalive: 'true',
 21      pc: {config: {
 22          iceServers: [{
 23            username: 'coturn',
 24            credential: 'coturn',
 25            urls: [ 'turn:213.63.138.90:3478?transport=udp',
 26            ],
 27          }]
 28        },
 29        iceTransportPolicy: 'relay', },
 30    });
 31  }
 32
 33  // Helper methods to attach/reattach a stream to a video element (previously part of adapter.js)
 34  attachMediaStream(element: HTMLVideoElement, stream: any) {
 35    try {
 36      element.srcObject = stream;
 37
 38    } catch (e) {
 39      try {
 40        element.src = URL.createObjectURL(stream);
 41      } catch (e) {
 42        console.log('Janus:error: Error attaching stream to element', e);
 43      }
 44    }
 45  }
 46
 47  // creates a Janus session
 48  createConnection(videoViewer: ElementRef<HTMLVideoElement>) {
 49    this.videoElement = videoViewer;
 50    if (!this.connection) {
 51      this.janusClient.createConnection().then((connection: any) => {
 52        this.connection = connection;
 53        console.log('New connection', this.connection);
 54        this.connection.createSession().then((session: any) => {
 55          session.attachPlugin('janus.plugin.streaming').then((streaming: any) => {
 56            this.streaming = streaming;
 57            console.log('Streaming plugin', this.streaming);
 58            this.streaming.on('pc:track:remote', (event: any) => {
 59              console.log('Remote event', event);
 60              const pc = event.target;
 61              if (pc) {
 62                pc.iceconnectionstatechange = (e: any) => {
 63                  console.log('iceconnectionstatechange', e);
 64                  if (pc.iceConnectionState === 'failed') {
 65                    pc.restartIce();
 66                  }
 67                };
 68              }
 69              if (this.videoElement && this.videoElement.nativeElement) {
 70                const vid = this.videoElement.nativeElement;
 71                console.log('Attach Video');
 72                this.attachMediaStream(vid, event.streams[0]);
 73              }
 74            });
 75            // ACK from Janus after stream is stopped
 76            this.streaming.on('message', (event: any) => {
 77              if (!this.videoStopped && event._plainMessage.janus === 'hangup') {
 78                console.log('Hangup Event', event._plainMessage.janus);
 79                this.videoStopped = true;
 80              }
 81            });
 82            // ACK from Janus when Asset disconnects
 83            this.streaming.on('detach', (event: any) => {
 84              if (!this.videoStopped && event._plainMessage.janus === 'hangup') {
 85                console.log('Detach Event', event._plainMessage.janus);
 86                this.videoStopped = true;
 87              }
 88            });
 89          });
 90        });
 91      }, ((error: any) => {
 92          console.log('Error connecting janus', error);
 93        }
 94      ));
 95    } else {
 96      if (this.streaming) {
 97        console.log('Streaming plugin already created');
 98      }
 99    }
100  }
101
102  // obtain the stream link, requested by the watch method
103  watchJanusStream(streamID: number) {
104      const callback = () => {
105          this.streaming.watch(streamID).then( () => {
106            this.currentWatch = streamID;
107          }).catch((error: any) => {
108            console.log('Janus:error: Attempt to watch', error);
109          });
110      };
111      setTimeout(callback, 50);
112  }
113
114}
In general, when using the Janus features, you would normally do the following (and that’s exactly what the provided code does):
include the Janus JavaScript library in your web page;
initialize the Janus JavaScript library and (optionally) passing its dependencies;
connect to the server and create a session;
create one or more handles to attach to a plugin (e.g., echo test and/or streaming);
interact with the plugin (sending/receiving messages, negotiating a PeerConnection);
eventually, close all the handles and shutdown the related PeerConnections;
destroy the session.
If you look closely, this logic is divided in the presented methods
constructor(): initialize the Janus JavaScript librarycreateConnection(): connect to the server and create a session and create one handler to attach to the streaming pluginwatchJanusStream(): requests a stream (sending/receiving messages, negotiating a PeerConnection)attachMediaStream(): attachs the janus object to the DOM video object
Once the library has been initialized, you can start creating sessions. Normally, each browser tab will need a single session with the server: in fact, each Janus session can contain several different plugin handles at the same time, meaning you can start several different WebRTC sessions with the same or different plugins for the same user using the same Janus session. That said, you’re free to set up different Janus sessions in the same page, should you prefer so.
Creating a session is quite easy. You just need to use the new constructor to create a new Janus object that will handle your interaction with the server. Considering the dynamic and asynchronous nature of Janus sessions (events may occur at any time), there are several properties and callbacks you can configure when creating a session:
server: the address of the server as a specific address (e.g., wss://bexstream.beyond-vision.pt/janus for WebSockets; on the tutorial we’ve choosen to use WebSockets communications) or as an array of addresses to try sequentially to allow automatic for fallback/failover during setup;iceServers: a list of STUN/TURN servers to use (a default STUN server will be used if you skip this property);ipv6: whether IPv6 candidates should be gathered or not;withCredentials: whether the withCredentials property of XHR requests should be enabled or not (false by default, and only valid when using HTTP as a transport, ignored for WebSockets);max_poll_events: the number of events that should be returned when polling; the default is 1 (polling returns an object), passing a higher number will have the backend return an array of objects instead (again, only valid for HTTP usage as this is strictly related to long polling, ignored for WebSockets);destroyOnUnload: whether we should destroy automatically try and destroy this session via Janus API when onbeforeunload is called (true by default);token,apisecret: optional parameters only needed in case you’re Authenticating the Janus API ;- a set of callbacks to be notified about events, namely:
success: the session was successfully created and is ready to be used;error: the session was NOT successfully created;destroyed: the session was destroyed and can’t be used any more.
These properties and callbacks are passed to the method as properties of a single parameter object: that is, the Janus constructor takes a single parameter, which although acts as a container for all the available options. The success callback is where you typically start your application logic, e.g., attaching the peer to a plugin and start a media session.
Drone Video Player
Now it’s time to create the required DOM object and logic to display the stream. Start by creating a dedicated component for the video-stream.
Video-stream component
The video stream component will be only responsible to attach a Janus Stream to a DOM video object. All the remaining logic will be left for other fragments.
To initialize the video-stream component, run the command:
ng generate component drone-video/component/video/video-stream
Afterwards, update the typescript code, with the following block:
 1import {AfterViewInit, Component, ElementRef, OnDestroy, ViewChild} from '@angular/core';
 2import {JanusService} from "../../../../lib/services/janus.service";
 3
 4@Component({
 5  selector: 'app-video-stream',
 6  templateUrl: './video-stream.component.html',
 7  styleUrls: ['./video-stream.component.css']
 8})
 9export class VideoStreamComponent implements AfterViewInit, OnDestroy {
10
11  constructor(private janusService: JanusService) {}
12
13  @ViewChild('videostream', { static: false, read: ElementRef }) videoElement: ElementRef<HTMLVideoElement> | undefined;
14  ngAfterViewInit(): void {
15    if (this.videoElement) {
16      this.janusService.createConnection(this.videoElement);
17    }
18  }
19
20  ngOnDestroy(): void {
21    console.log('Closing Video Stream');
22  }
23}
Update the video-stream.component.html
1<video class="rounded centered" style="width: 80%" #videostream id="videostream" [muted]="true" controls autoplay playsinline></video>
Viewer component
To test if all the previous developments work, let’s create a simple viewer component. You can init it by running the following command:
ng generate component drone-video/component/viewer
On the viewer, add Janus Service and Asset Service to the new component. Note that to simplify the tutorial, we have choosen to visualize the first drone with a stream. As an exercise, we suggest to you modify the provided code, and try to connect to another aircraft within your organization! If you want to dive any deeper, you can explore the possibility to visualize multiple drone streams in parallel or render 360º streams using canvas! All of this is possible with our media server, and the possibilities are endless.
Start by adding a new variable Stream to our Asset class. Generate it using:
ng generate class --skip-tests=true drone/models/stream
And add the variable mountPoint, which will represent the stream id for a given drone.
export class Stream {
  mountPoint: number;
}
You will also need to add import and add this variable to the asset class (drone itself):
 1import { Drone } from "./drone";
 2import { Stream } from "./stream";
 3
 4export class Asset {
 5
 6    id: string;
 7    name: string;
 8    mountPoint: number | null;
 9    isActive: boolean;
10    drone?: Drone;
11    lastConnected: Date | null;
12    stream?: Stream;
13
14    constructor(type: string) {
15        if (type === 'Drone') {
16          this.drone = new Drone();
17        }
18        this.id = '';
19        this.name = '';
20        this.mountPoint = null;
21        this.isActive = false;
22        this.lastConnected = null;
23
24    }
25}
Modify the viewer component typescript with the following code:
 1import { Component, OnInit } from '@angular/core';
 2import {JanusService} from "../../../lib/services/janus.service";
 3import {AssetService} from "../../../drone/services/asset.service";
 4import {PaginatorDto} from "../../../lib/models/paginator.dto";
 5import {Asset} from "../../../drone/models/asset";
 6
 7@Component({
 8  selector: 'app-viewer',
 9  templateUrl: './viewer.component.html',
10  styleUrls: ['./viewer.component.css']
11})
12export class ViewerComponent implements OnInit {
13
14  paginator: PaginatorDto = new PaginatorDto();
15  hasStream = false;
16  selectedDrone: Asset;
17
18  constructor(
19    private assetService: AssetService,
20    private janusService: JanusService,
21  ) { }
22
23  ngOnInit(): void {
24    this.assetService
25      .getAllDrones(this.paginator)
26      .subscribe((assets) => {
27        // You can change this logic for your own
28        // For the demonstration purposes, we will just find the first available stream
29
30        for (let i = 0; i < assets.length; i++) {
31          const asset = assets[i]
32          if(asset.stream) {
33            this.selectedDrone = asset;
34            this.hasStream = true;
35            setTimeout( () => {this.janusService.watchJanusStream(asset.stream.mountPoint)}, 1000);
36            // Nothing else to init, so we can just break here...
37            break;
38          }
39        }
40      });
41  }
42}
Also, update the viewer.component DOM:
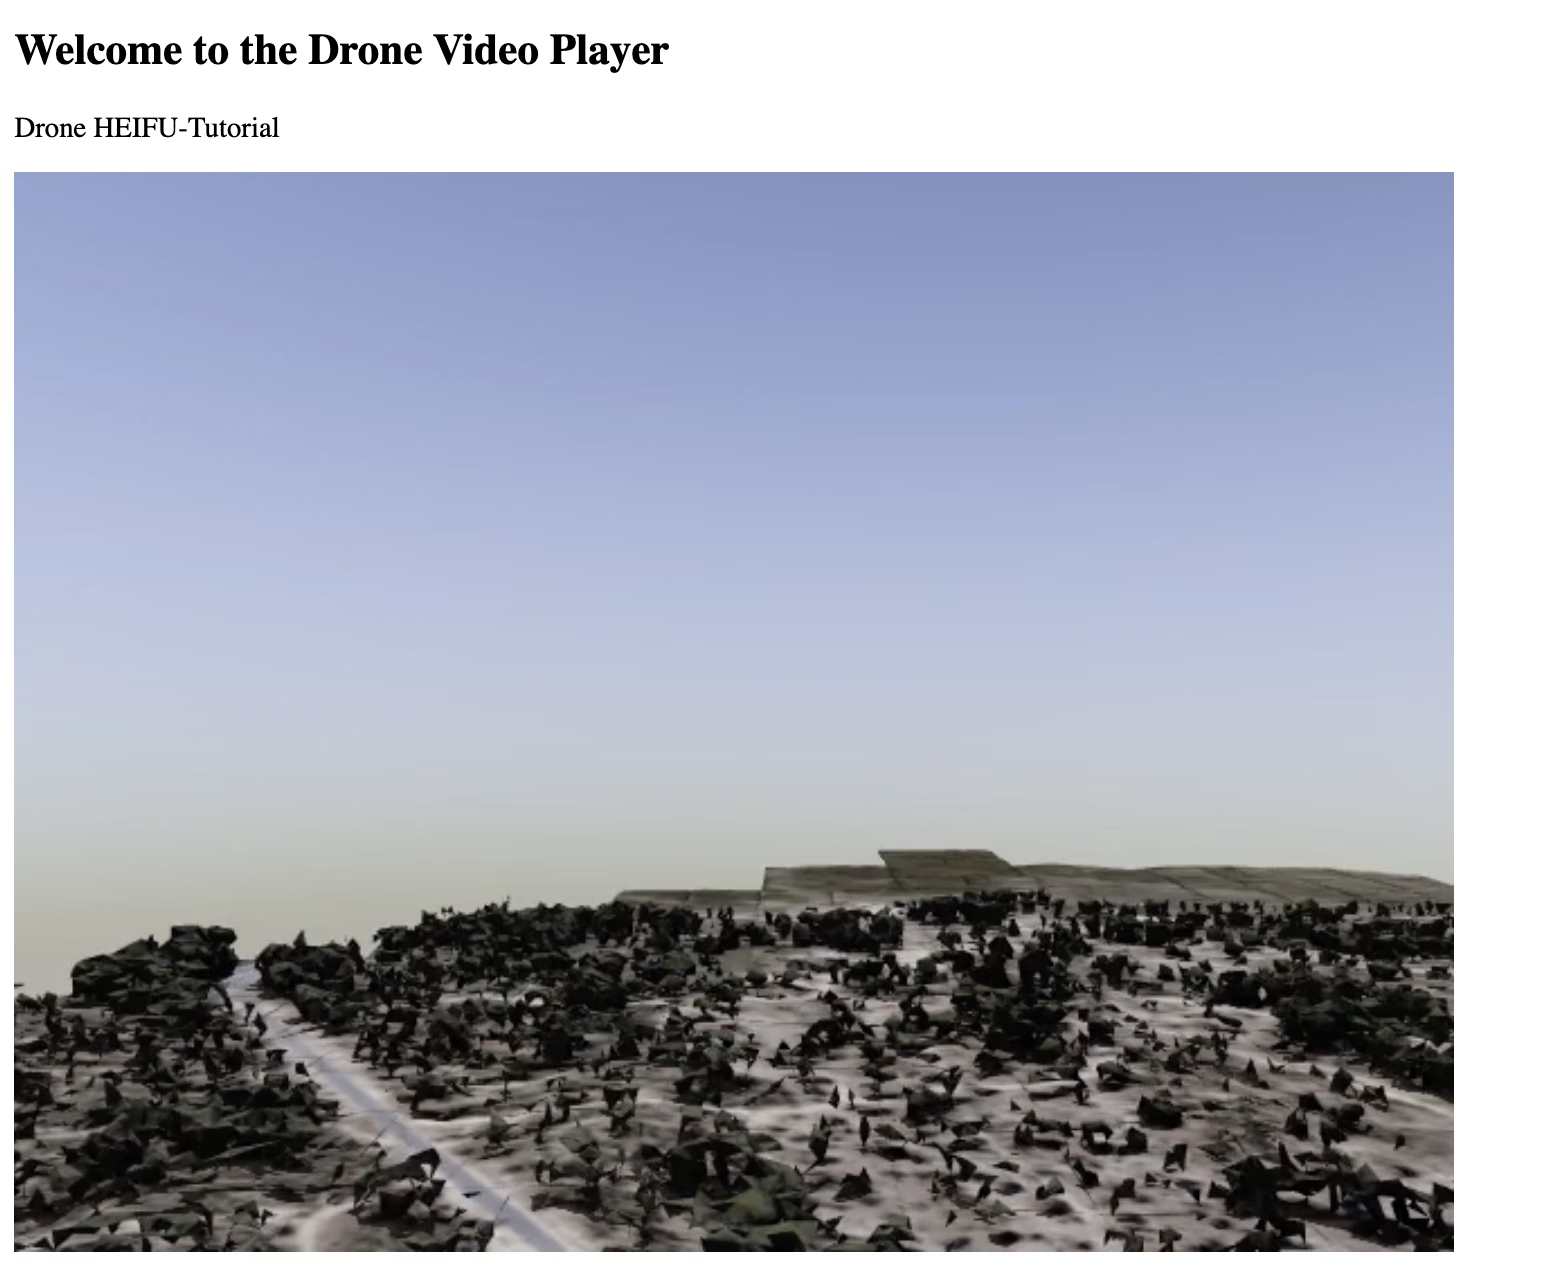
1<h2>Welcome to the Drone Video Player</h2>
2<div *ngIf="hasStream">
3  <p>Drone {{selectedDrone.name}}</p>
4  <!-- video stream -->
5  <app-video-stream></app-video-stream>
6</div>
7<p *ngIf="!hasStream">Looking for a drone with an active stream. If this take too long, check your simulation/video-stream and trying refreshing this page.</p>
If you manage to watch the stream of your drone, congratulations! You have already have everything to visualize drone streams. If there’s a drone with a stream at the Tutorial Organization, you should have something like the following:
If there are not any drone connected with a stream online, either you can run a simulated HEIFU with stream capabilities, or you can request Beyond Vision to launch an aircraft with streaming capabilities. Email us at info@beyond-vision.pt
Now, feel free to adapt the tutorial to any combination that better suits your needs, such as multiple streams in parallel, video stream relay, and much more.
Adding stream viewer to drone list
Wouldn’t it be cool, if you could pilot and visualize the stream at the same time? Let’s get it done!
Start by modifying the drone-list component. The modifications are quire simple. Add the Janus Service to your typescript, and call the watch method to whenever a new drone is selected:
First modification - add the Janus Service:
 1import { Component, OnDestroy, OnInit } from '@angular/core';
 2import { Subscription } from 'rxjs';
 3import { PaginatorDto } from 'src/app/lib/models/paginator.dto';
 4import { Asset } from '../../models/asset';
 5import { MavrosState } from '../../models/mavrosState';
 6import { MissionDrone } from '../../models/missionDrone';
 7import { Position } from '../../models/position';
 8import { Velocity } from '../../models/velocity';
 9import { AssetService } from '../../services/asset.service';
10import { JanusService } from "../../../lib/services/janus.service";
11
12@Component({
13  selector: 'app-drone-list',
14  templateUrl: './drone-list.component.html',
15  styleUrls: ['./drone-list.component.less']
16})
17export class DroneListComponent implements OnInit, OnDestroy {
18
19  assets: Asset[] = [];
20  paginator: PaginatorDto = new PaginatorDto();
21  subscriptions: Subscription = new Subscription();
22
23  selectedAsset: Asset = null;
24
25  DRONE_FE_MAX_SPEED = 3.0; // Drone Frontend Constant Default Value
26
27  constructor(private assetService: AssetService,
28              private janusService: JanusService,) { }
Secondly, call the watch method whenever a new drone is selected:
 1  public selectAsset(selectedAsset: Asset) {
 2    this.selectedAsset = selectedAsset;
 3    this.selectedAsset.drone.md = new MissionDrone();
 4    if(selectedAsset.stream) {
 5      setTimeout( () => {
 6        this.janusService.watchJanusStream(selectedAsset.stream.mountPoint)}, 1000);
 7
 8    }
 9    this.initSubscriptions();
10  }
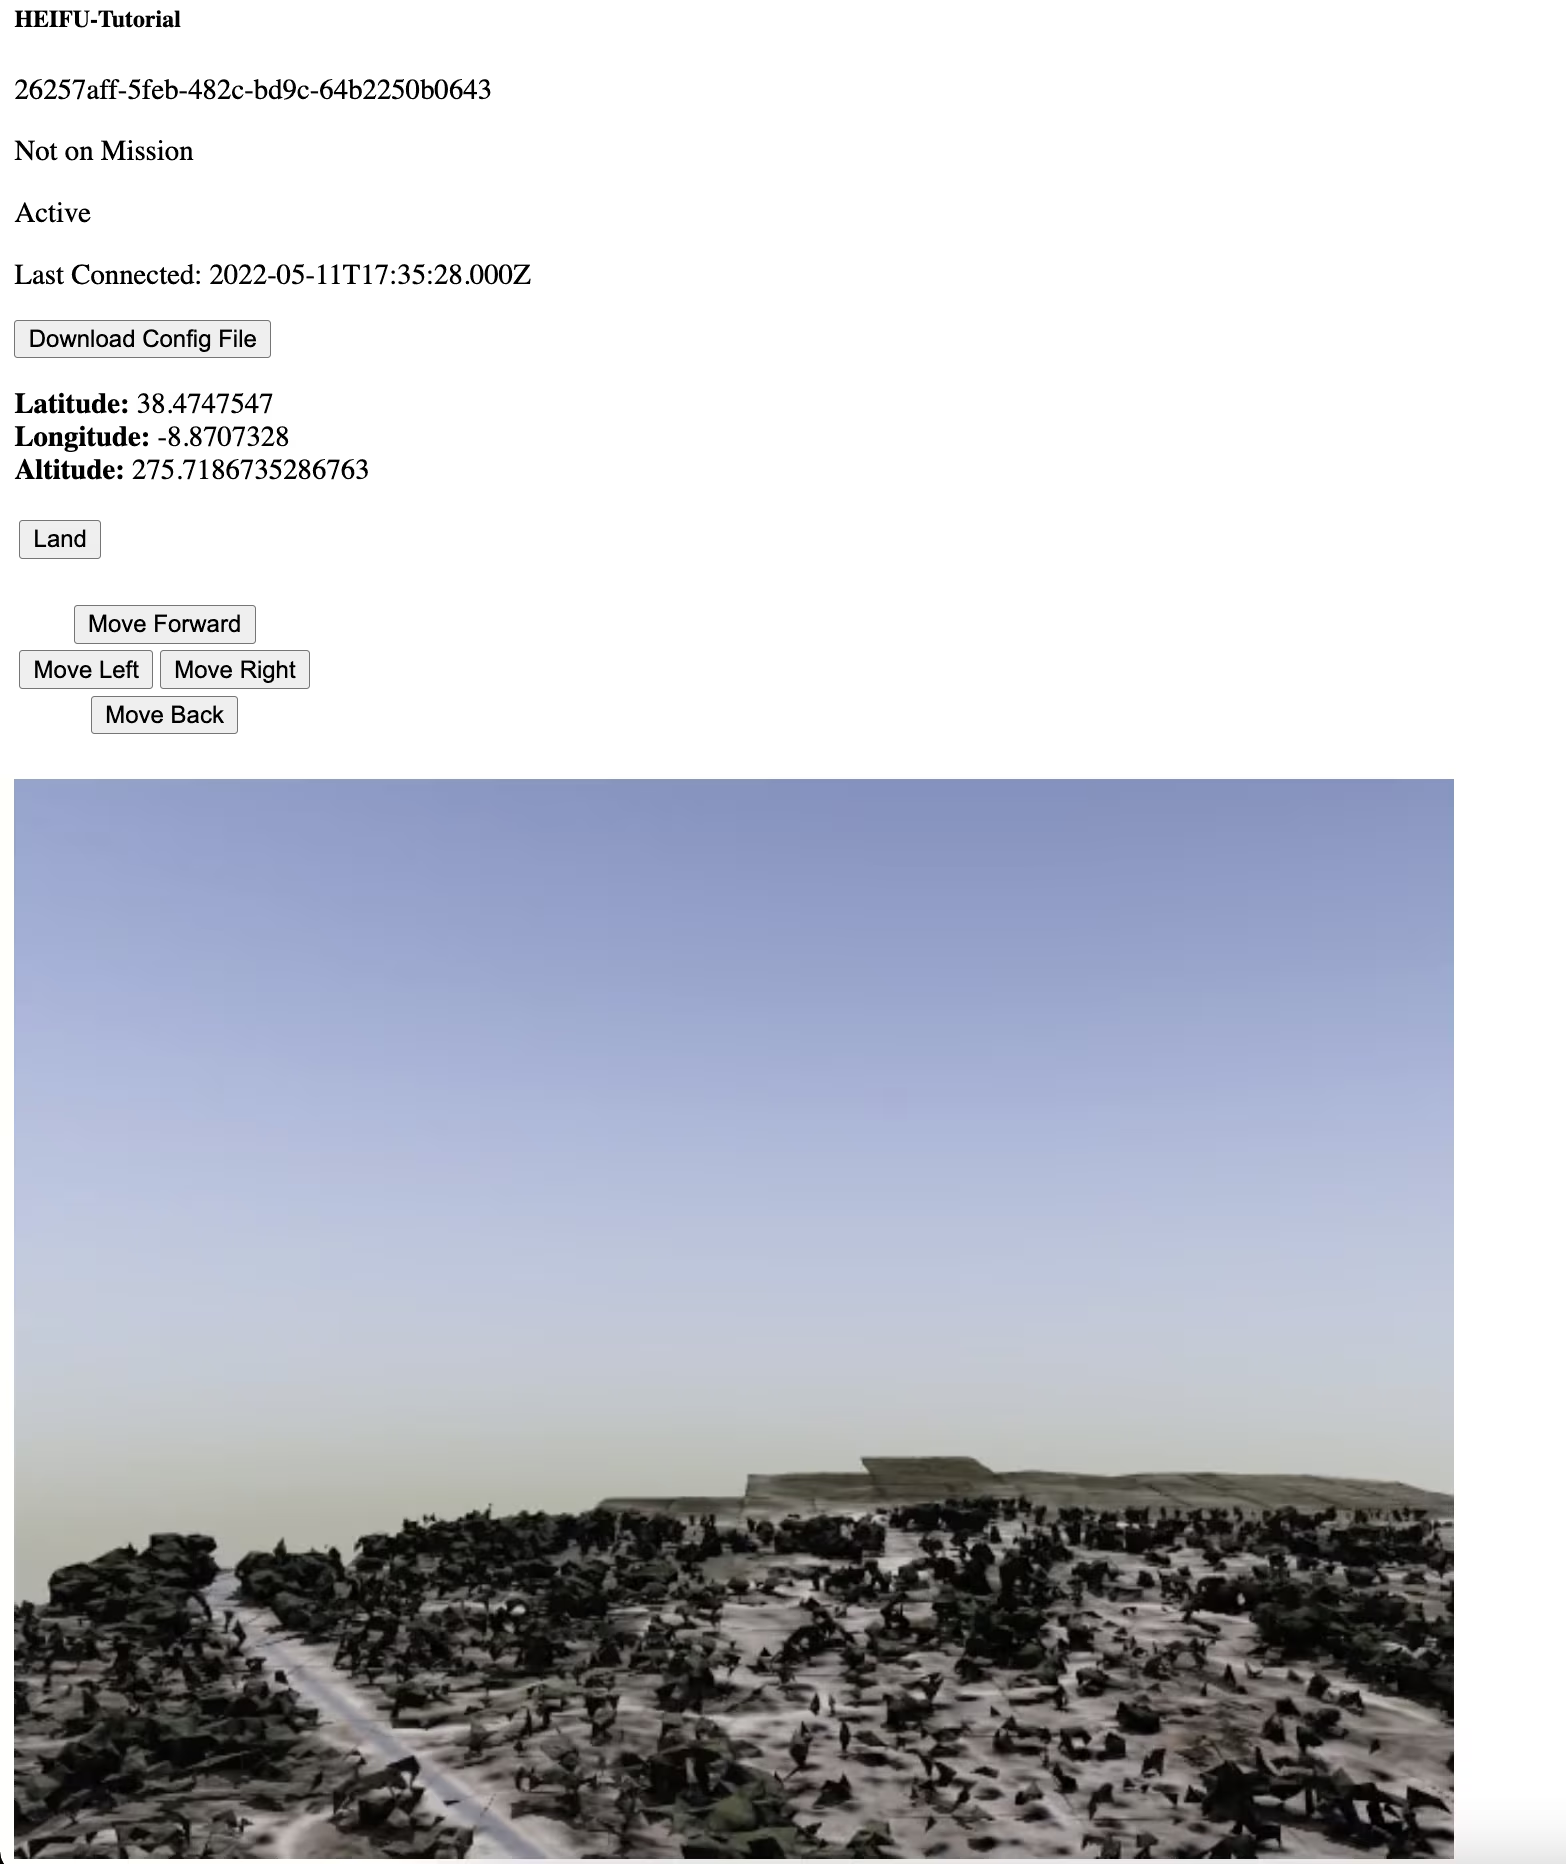
Now, all that is required, is to add our app-video-stream to the drone-list dom. Let’s do it:
1<h3>Drones List</h3>
2<hr><hr>
3<div *ngFor="let asset of assets">
4 <h5>{{ asset.name }}</h5>
5 <p>{{ asset.drone.id }}</p>
6 <p *ngIf="asset.drone.latitude">Latitude: {{ asset.drone.latitude }}, Longitude: {{ asset.drone.longitude }}</p>
7 <p *ngIf="asset.drone.onMission">On Mission</p>
8 <p *ngIf="!asset.drone.onMission">Not on Mission</p>
9 <p *ngIf="asset.isActive">Active</p>
10 <p>Last Connected: {{asset.lastConnected}}</p>
11 <p>
12 <button (click)="downloadConfig(asset.id)">
13 Download Config File
14 </button>
15 </p>
16
17 <p *ngIf="asset.isActive && (!selectedAsset || asset.id !== selectedAsset.id)"><button (click)="selectAsset(asset)">Select Drone</button></p>
18
19 <p *ngIf="asset.isActive && selectedAsset && asset.id === selectedAsset.id">
20 <span><b>Latitude:</b> {{ asset.drone.md.position.latitude }}</span> <br>
21 <span><b>Longitude:</b> {{ asset.drone.md.position.longitude }}</span> <br>
22 <span><b>Altitude:</b> {{ asset.drone.md.position.altitude }}</span> <br>
23 </p>
24
25 <div *ngIf="asset.isActive && selectedAsset && asset.id === selectedAsset.id">
26 <table>
27 <tbody>
28 <tr>
29 <td *ngIf="selectedAsset.drone.flightStatus.isLanded"><button (click)="takeOffDrone()">TakeOff</button></td>
30 <td *ngIf="!selectedAsset.drone.flightStatus.isLanded"><button (click)="landDrone()">Land</button></td>
31 </tr>
32
33 <tr>
34 <td> </td>
35 </tr>
36
37 <tr *ngIf="!selectedAsset.drone.flightStatus.isLanded">
38 <td colspan="2" align="center"><button (click)="moveDroneForward()">Move Forward</button></td>
39 </tr>
40 <tr>
41 <td><button (click)="moveDroneLeft()">Move Left</button></td>
42 <td><button (click)="moveDroneRight()">Move Right</button></td>
43 </tr>
44 <tr>
45 <td colspan="2" align="center"><button (click)="moveDroneBack()">Move Back</button></td>
46 </tr>
47 <tr>
48 <td> </td>
49 </tr>
50 </tbody>
51 </table>
52 <app-video-stream></app-video-stream>
53 </div>
54
55 <hr>
56</div>
Easy enough, right? You are all set now!
Hammer Time!!!
If you reached this point, there’s nothing stopping you! Not even the sky is the limit!
Start developing your applications on top of what you just learned, and pilot more and more aircraft! If you want to do it in the real-world, rather than in the simulated environment, purchase an HEIFU aircraft.